For this week’s article, I decided that I would move an article from the old WordPress site into my new server. The article was written in 2014 so therefore I haven’t been to the Tiger’s Nest monastery in 5 years so perhaps I should make plans to revisit soon. For now, here is the original article with some updated descriptions.
No matter what itinerary you choose when you visit Bhutan, your travel agent will most certainly include a trip to the Taktsang Monastery unless you have been there before. Even those who visit Bhutan multiple times usually enjoy a trip up to the monastery a second or third time (one of our clients has probably been up more than 10 times).
When I talk about Bhutan to people some people know about it or have heard while others say they have not. The ones who say they have not heard about Bhutan I will show them a picture of the Tiger’s Nest Monastery on my phone and they respond with “Yes, I have seen this place somewhere” (on TV or internet is what they mean).
Location in the Itinerary
The monastery is located about a 20-minute drive north of the town of Paro. This location makes is natural to schedule the hike at either the start of your trip or at the end of the trip to Bhutan.
We have flipped back and forth about which end of the trip to schedule the hike. Currently we are putting it as the final day since we want that experience to be something that guests take away with them. When guests are going on a trek starting from Drugyel Dzong, we always schedule this as the first day since it gives the trekkers a reason to pull on their hiking boots before their real trek begins.
You can actually catch a glimpse of the monastery from the airplane if you are lucky and the following three things are true:
- You are sitting on the left side of the plane…meaning you are actually double lucky since you probably got to see the mountains during the entire flight as well
- The landing is from the North. The direction of the landing is really quite random and decided by the pilot based on wind direction.
- You look at the right place at the right time. Chances are, if this is your first trip to Bhutan you are going to be completely distracted by everything else going on through the window at that point to not even think about trying to spot the tiger’s nest.
Altitude Acclimatization
Most people who visit usually have a concern about acclimatization to the high altitudes in Bhutan. The Paro valley elevation is about 2,200m (7,300 feet); most people would not really be affected at this altitude except perhaps a small headache when you first arrive but likely you won’t really notice the altitude until you start climbing up hills to visit monasteries. The hills are usually very steep which makes it a challenge to begin with, and of course by the time you finally reach the monastery you will have gained a lot of altitude. In the case of Tatksang the monastery is at 3,200m (10,500 feet) which is high enough to start noticing the lack of oxygen on top of the 900 – 1000 meter climb.
You should not need to worry about any altitude sickness medicine as you will only be at the monastery for an hour before starting the walk back down. You can also abandon the hike at the cafeteria or the view point but of course we certainly encourage people to try and reach the monastery. We have seen people carrying mini-oxygen bottles with them; this seems quite excessive to us.
What to Bring
You don’t need hiking boots for this hike but if have them with you because you are doing some other trek then your ankles may appreciate wearing them. I’ve made my trips up just wearing sneakers. The sneakers will be a challenge if it is wet or your sneakers are like mine and completely worn flat with no grip.
You will likely need a jacket during the winter time and of course a bottle of water. You may wish to have a small day pack with you to carry the stuff. As far as photography is concerned, I’ve shot these photos you will see on this page with a 28-105mm, a 17-40mm, and a 70-200mm. The long telephoto is not really necessary unless you are looking for the close shots from far away. If you are planning to complete the trip right to the monastery then anything at all from a point and shoot camera to a mobile phone will be fine for getting nice pictures.
The Google Earth KML File
I’ve prepared a small KML file in case you have Google Earth installed or you want to upload this to a GPS unit to carry with you. The path from the view point until the Monastery is not very good or accurate…I’ll remember to carry my GPS next time to get some better data.
The Hike Up – To the Cafeteria


You start at the parking lot and you will be led by your guide through a small wooded area. There will be some people set up with some souvenirs that you can look at buying. Generally, the shop keepers here are not like ones you’ll find in other places. They will tend not to be pushy and will just sit there and hope that you stop. I would suggest that if you do want something, it is better to stop on the way down or else send it back to the car right away. The last thing that you need is to carry some extra weight all the way to the top and back again.
Once you reach the first clearing you will get to see the monastery up in the mountains. It will look extremely small and you may assume that this is going to just few a minute’s walk. The reality of course is that there is a lot of altitude to gain and that is going to add a lot of time. Although the monastery is only a 3km route, it is nearly 1km higher.
If you want, you can pay 500 ngultrums (about $8) to ride a pony about half-way up the hill. It is a good option for people who are not able to make the hike but unfortunately you will only be able to reach the cafeteria by pony and will need to continue on foot for the rest of the trip.
As you get going up the path, you’ll find that there are sections of the path which are quite nice and easy with some concrete pathways but most of the path is quite steep to navigate. You’ll soon develop your own techniques of what type of rock to step on or where to put your feet as you go to make the trip easier. You will see some “short cuts” that look like they will cut out part of the switch back paths. Although it looks like it could save you a bunch of time, I don’t recommend using them. The shortcuts are very steep and if you take on, you’ll probably end up having to sit for a while to recover. I suggest the slow and steady pace, but each person will be different.
It will take you about one or a bit longer to reach the cafeteria. Here you will have the chance to sit and drink some tea, relax and enjoy a nice view of your final destination. We sometimes find a few people hanging around at the cafeteria waiting for the rest of the group to return. These are people who found it just a bit too strenuous to make it any further. If you feel like you just can’t make it any further, don’t worry you are not the first person to just make it half-way.
The Hike Up – The Viewpoint


After your rest at the cafeteria it is time to start upwards again. The next part of the trip is not as steep and it will only take about 30 minutes to reach a place called the “viewing point”. There are pictures at the end of this blog taken from the view point.
If you don’t think you can make it the entire way to the monastery, this is a good place to reach because you can get some very nice photos with just a regular camera and lens. The view point is about level with the monastery as you can see from the photos.
The Hike Up – The Stairs


By now, your legs are probably aching and to make matters worse, we have reached what I think is the most difficult part of the trip, the stairs. You will now step down about 200 steps and it will be very difficult to keep your legs steady since they are tired. Once you reach the bottom of the steps you now get to change direction and head back up about another 200 steps. It is at this point that you will wish that you had the option of a zip line to cross directly.
In times past there was actually no railing on these steps and I can only imagine the increased stress of such a walk would be. There were some incidents where people did fall.
During the winter months you will find that at the bottom of the stairs might be covered in ice so be careful. Even if the ice has melted on the path, you might find pieces of ice falling down from the high cliff to the left.
The Monastery
Once you reach the Monastery, this is the one place in Bhutan where you will be forced to hand over your camera to be kept in a locker. You are permitted to take photos around the monastery but not inside.
The official name of the Monastery is Paro Taktsang but many people will call it the Tiger’s Nest, likely because it’s easier to remember and spell. The name Tiger’s Nest comes from the story that Guru Padmasambhava arrived in Bhutan while flying on the back of a tigress and meditated for 3 years, 3 months, 3 days, and 3 hours.
For Guru Padmasambhava, it was a good thing that he was not subject to the government mandated minimum tariff was not in place at the time. Since the 3 years, 3 months and 3 days calculates to about 639 low season days and 552 high season days (the exact number depends on the actual starting and ending dates). Guru Padmasambhava turned his wife into the tigress therefore they would have to pay the 2 person supplement of $30 per day. Luckily they would get a royalty discounts of $32.50 per day for days 9 through 14 and $65 per day for nights 15 to the end. The total charge would end up being $224,830 per person plus the $40 visa fee.
I do suggest that you make a donation to the monastery. The amount is up to you but if you have $20 to leave it will certainly help the monks who live there with their food costs, but if $20 is too much then feel free to leave something smaller. Some of our guests leave as much as $100 while others leave only $1-$5. Remember that there are no entrance fees paid except through the royalty so leaving something at the monastery goes directly to the monastery.
In the winter months the temperature here will be very cold due to the high altitude and the strong winds. You may have started off in the parking lot feeling quite warm but do remember to take a jacket with you.
The Return Trip
After your visit to the monastery you will now have to endure the walk back down to the parking which turns out to be slightly more difficult than you would wish. It starts with the 200 some steps down followed by 200 steps back up to reach the view point. The walk down to the cafeteria is not bad and I suggest that you stop for a few minutes if you have the time. After the cafeteria, the path becomes steep and could be slippery.
During the descent you can feel free to take any of the short-cuts available. You will find that although it is easy to go down, the risk of slipping on the steep slopes is high. If you think that running is a good idea, I suppose you’ll go fast but you will also have a difficult time getting stopped to turn each of the corners.
The Photos
The photos in the galleries presented here were taken during 3 hikes in both winter and summer months. You will be able to tell the difference by the drier look during the winter compared to the greener look of summer. During the first hike I walked all the way to the Monastery, the other two times I stopped at the cafeteria and the viewing point due to the time.
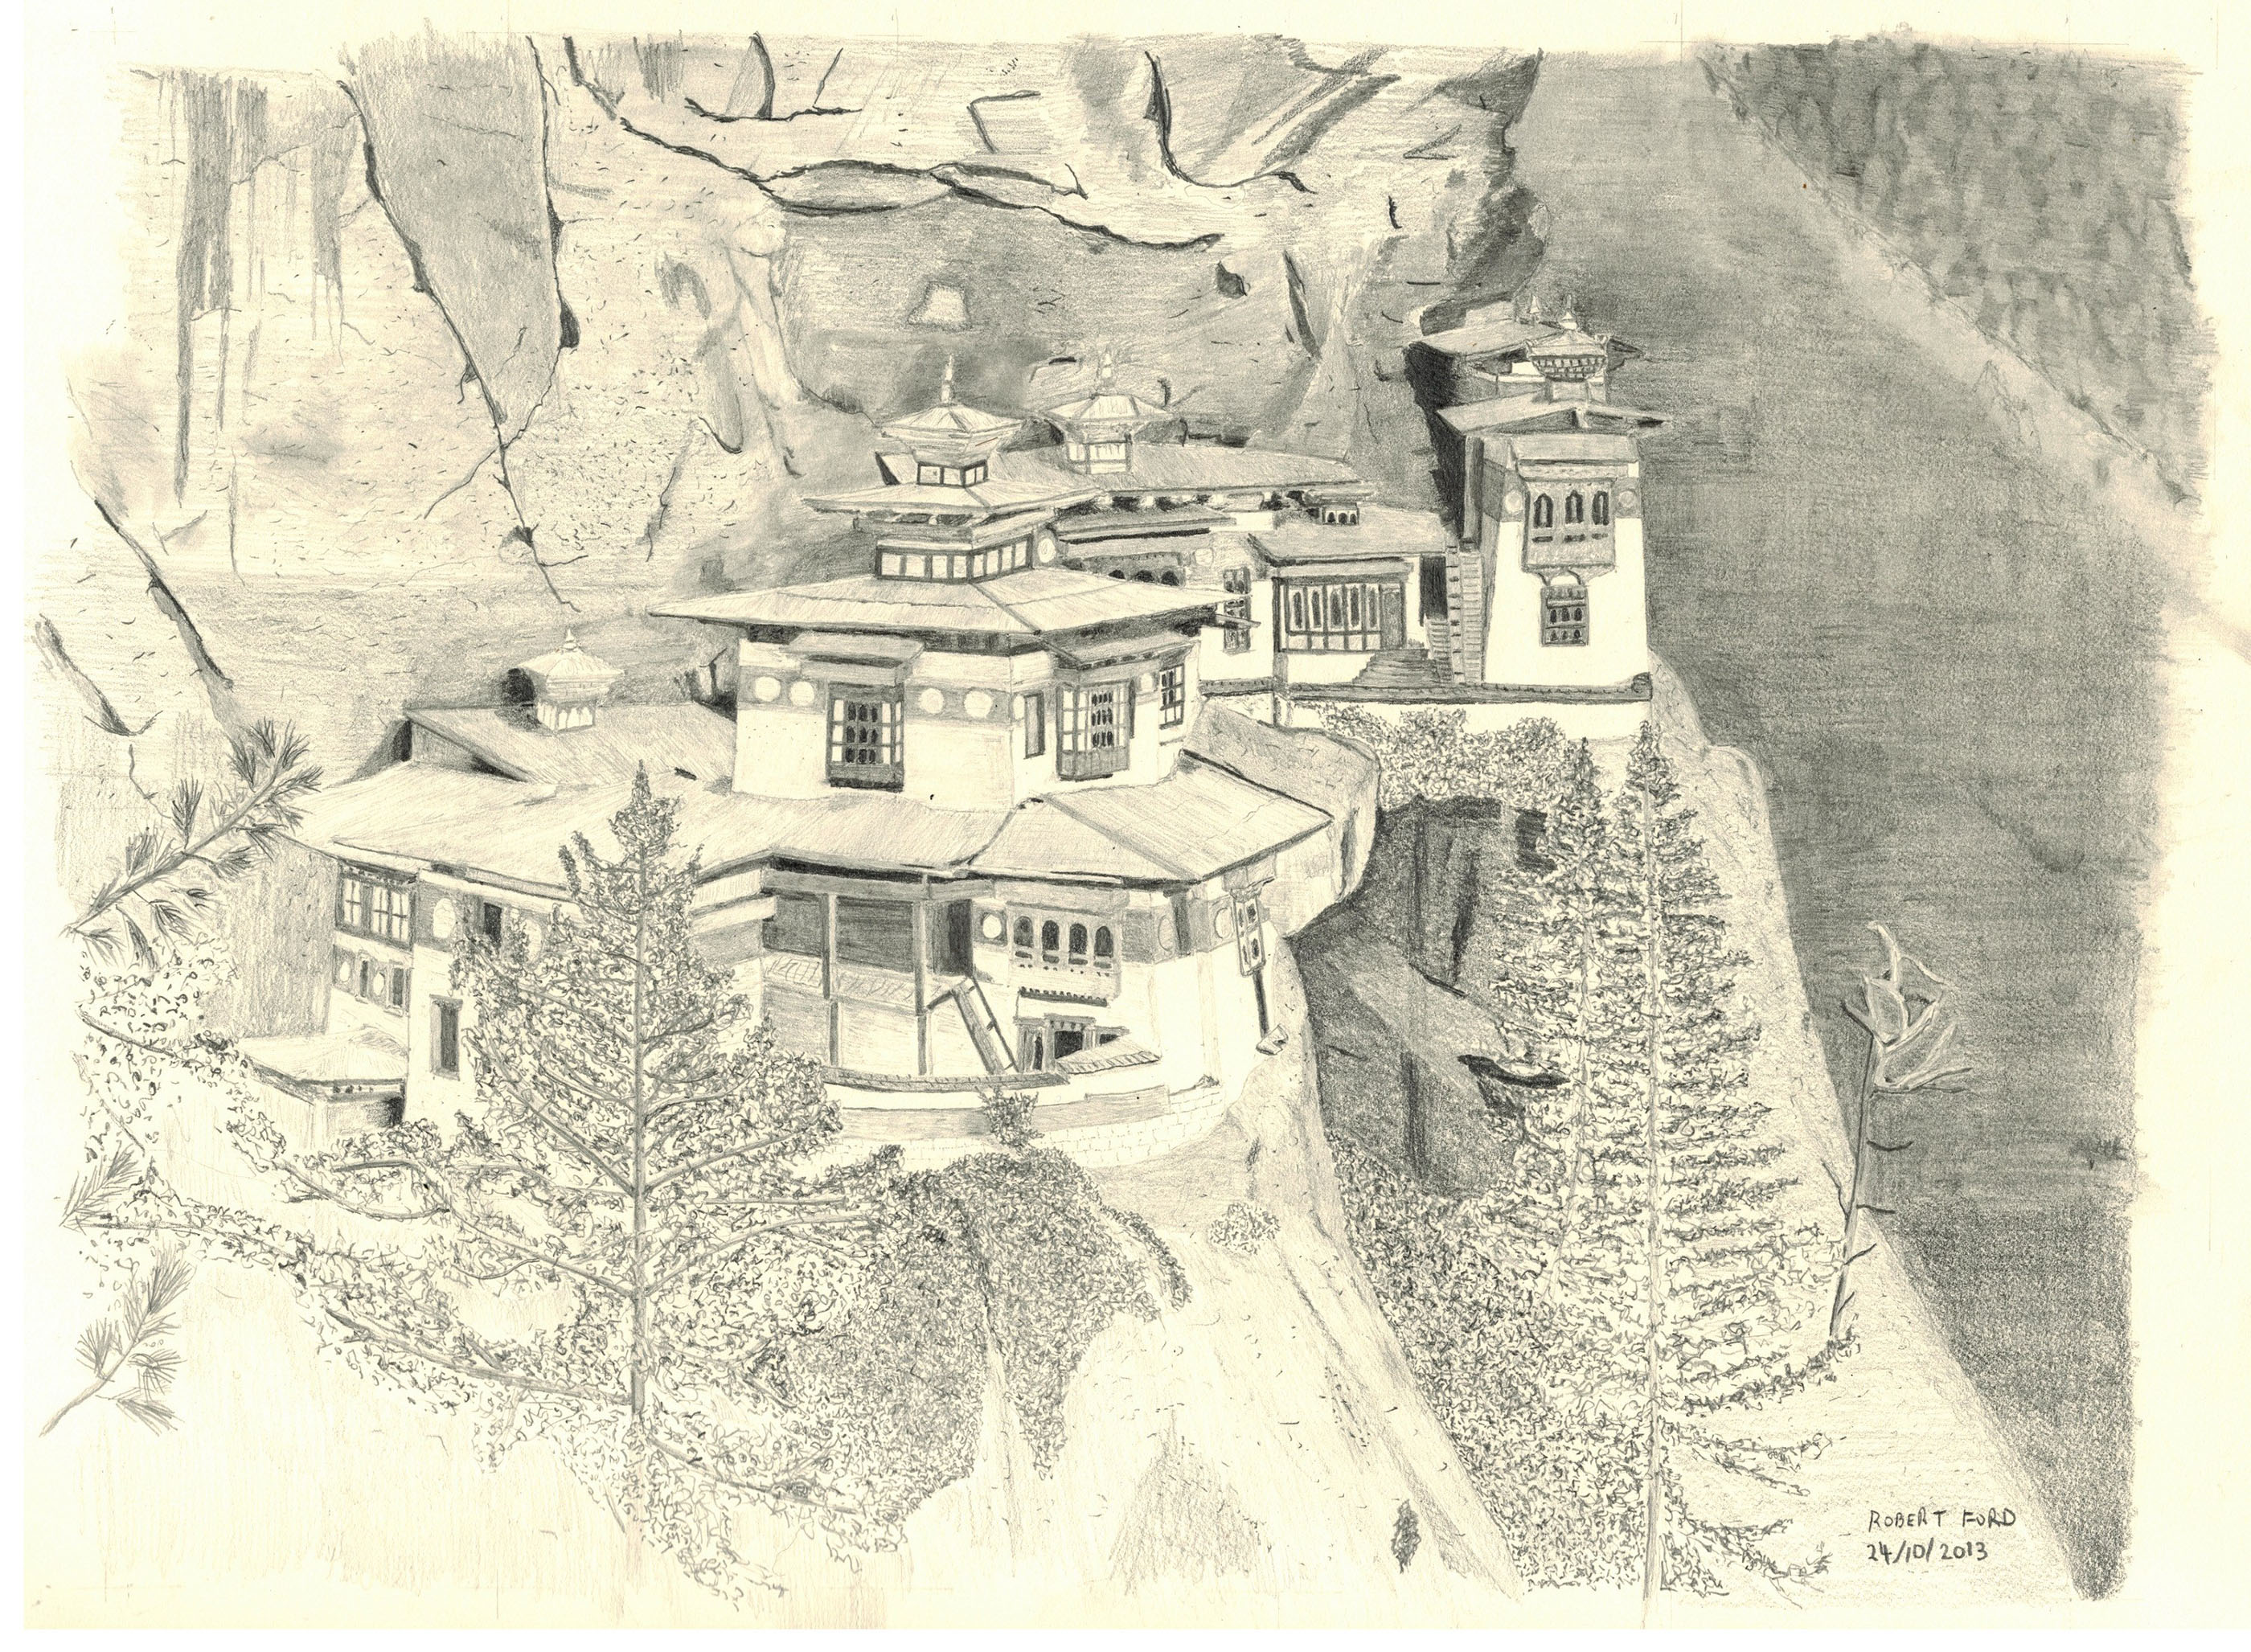
The Pencil Sketch
Sometime after the trip I was learning how to do pencil sketching and I thought that one of my photos would make a good subject. I certainly did not sketch this while on the hike, I’m not that talented. Instead it took a large number of days studying the photo and adding small bits of graphite here and here.